Archive
Kombucha, just ahead of the recall
I’ve long been interested in fermented foods. Growing up, my mom started making sourdough bread after ordering (or being gifted?) a starter, and I just remember thinking how amazing it was that this weird alien thing in the fridge was making our bread so delicious, every day. That was the spark.
In the early 2000s I got very interested in preserved Japanese and Korean foods, especially miso, umeboshi, kasu, and kimchi. I haven’t tried making my own yet, but I have a great book about making miso and will one day give it a shot (it takes over a year to make it properly).
When we moved to North Carolina and I started working from home full time, my interest in fermentation was rekindled and I grew my own sourdough starter. I documented it pretty well and made some very pretty loaves before letting it go to sleep in the fridge. I will wake it up one of these days and see how it’s doing.
About six weeks ago, I started to get interested in the kombucha tea craze that’s sweeping the country. My friend Eric has been drinking it for years and I never paid it much attention until I started hearing how expensive it was getting and how some stores weren’t carrying it any more. I didn’t know at the time that it was fermented, or that it could be made by anyone just by starting out with an unpasteurized bottle of the stuff. When I found this video on YouTube though, the game was on.
After a few trips to two different Whole Foods stores, we finally tracked down a bottle of usable Kombucha tea, and I got to work. I boiled the water, added the tea to steep, poured in the sugar and waited for the temp to come back down into the 70s F before pouring in the tea. It took about 6 hours for all that water in the thick glass, to come to temp. (I’d revise my process for next time).

Because I’d chosen a glass container (an old cookie jar) that was about 1.5 – 2 gallons in which to make my tea, it took nearly four weeks for the SCOBY to form on the top, and for me to determine that it was of sufficient size to warrant the batch complete.


I used a white tea to make the brew and while it was only mildly effervescent it was quite vinegary on the nose and sharp on the back end. I gave a few bottles away to friends who drink kombucha regularly and they both remarked that it was very good, and quite strong.
For my next batch I used green tea which, according to online discussion boards, will make a milder kombucha that is better enjoyed straight than the black tea and white tea varieties, which are frequently blended with with fruit or other herbal teas.

My newest batch made from that green tea is very light and lovely, perfect on its own over ice cubes. So far I’ve given away three bottles and all were met with high praise and hearty thanks, especially in light of the recent recall.
Having never been a kombucha drinker before making my own, I don’t have a broad reference against which to compare, but I enjoy my draught and find that I am nicely alert when drinking it. (I think that’s the mild caffeine.) I also find that I don’t slug it down like I do normal iced tea, due to the slight effervescence and mild vinegar nose. It is best sipped and enjoyed. The best part though is that I have a new batch about every 10 days, and a living community of weirdness, in my closet.
Poultry Odyssey: The First Ten Months
Last May we did a tour of backyard chicken coops in Raleigh, The Tour De Coop. It was a birthday present from my partner, Paige, that we’d drive around all day and do background research for our own backyard flock.
I’d long expressed an interest in backyard chickens and was thrilled when she was also interested in starting a flock. It helped that the city council in Durham, NC had recently passed a bill permitting residents inside the city limits to have up to 10 chickens (no roosters), as long as certain steps were taken to coexist with neighbors respectfully — things related to the location of the coop relative to property lines or neighboring buildings, etc. (Our neighbors have been very supportive.)
In August or September we finally got on the ball, and after talking about it, decided to buy a kit coop online.

Mail Order Simplicity
It didn’t take any time at all to put the kit together. It came it two boxes — the hutch in one, flat packed, about 90% pre-assembled; the coop in another, again, about 90% assembled. Within about 10 minutes, we had a little situation for our chickens. Our plan was to procure some juvenile birds from someone locally, and hopefully start getting eggs before winter set in.
We weren’t terribly concerned about “bio-security” living where we do, but we should have been. Not two months in, one of our birds was taken in broad daylight by a raccoon (it was actually a cloudy day). About a month later, we lost another. In both cases, it was our fault. During the day we’d let the birds roam around our yard unsupervised. I’d open their coop about 8 a.m. and by 5 or 6 p.m., they’d trundle back into the coop, go into the hutch and roost on a pole in there. It was a great situation, but our yard provides no security from raccoons or cats or dogs that may be wandering the nearby woods. This began a several month period during which I tried various methods to keep them contained during the day. Luckily, winter was coming on and they would spend much of it in their coop.
Being bantams, and now only two in number, their 15-square foot coop plus hutch was plenty big, but they were used to foraging for much of their diet and except on rainy or snowy days, I felt very bad about keeping them literally, cooped up.

Snow Day

Christmas Lights
Around Christmastime, the nights started getting colder. We’d read about putting a single bulb in their hutch but I decided to play a little and hung some large bulb chirstmas lights in the coop instead. They could still sleep in the dark in the hutch or roost under a bulb in the coop. Depending on the night, they variously did both. As the nights got still colder and winter wore on, I eventually took this string of lights out of the coop and put a 40-W bulb in the hutch.

Chicken Run
Around February, the “cooped up” chickens were starting to get to me, so I put up a run. I got some T-posts and an 80′ roll of chicken wire at the local hardware store and encircled their coop with a run about 25′ x 10′. It worked great for about three days, until one of the girls learned that she could fly right over that chicken wire.
Several weeks later I returned to the store for some 8′ tall T-posts, and proceeded to hang a second row of chicken wire (I had plenty left over on the roll). That lasted another few days before the chickens figured out that by jumping up on their coop they could easily fly over the 6′ tall fencing.
A several month-long battle ensued during which I attempted to keep them inside the run during the day, and closed their coop up at night. Around March, one night I didn’t latch the coop and raccoons scaled the run and got into the coop. We lost our third chicken. That was the end of our patchwork attempts at bio security and urban chicken keeping, in a raccoon zone. It was also a sign that we needed more chickens.

Baby Chicks in a Brooder Box
In late April, our four chicks from MyPetChicken.com arrived, and I set up a little brooder in our back bathroom. As they grew, I moved them to a much larger brooder pen in our crawl space by the car port, but both were similar in construction (IKEA cardboard and a heat lamp, with pine shavings) and effectiveness. And in May, construction began on our big coop.

Temporary Housing

Under Construction
By the end of May, our lone chicken was parading around in her coop, which was based on designs we found on the Web and a fellow who documented the heck out of his own backyard coop project. A few weeks later, when our new girls were old enough, we used the old coop fencing to put the four chicks into the coop with the hen who was by now laying an egg a day, regularly. They got acquainted quickly, and two weeks later, we removed the partitions and they now live in the coop altogether. Big chick-chick is on the top of the pecking order, but in a few months when the chicks are larger than she is, I expect a re-ordering of the lineup.

Chicken Coop 3.0
Our backyard chicken experiment continues to this day. Then next project will be to construct a chicken tractor, so that we can return the girls to foraging and keeping our yard and garden free of ticks and fleas and other icky critters.
Related: Backyard Chickens on Burkbum.com
Starting From the Top: Wooden Spoons

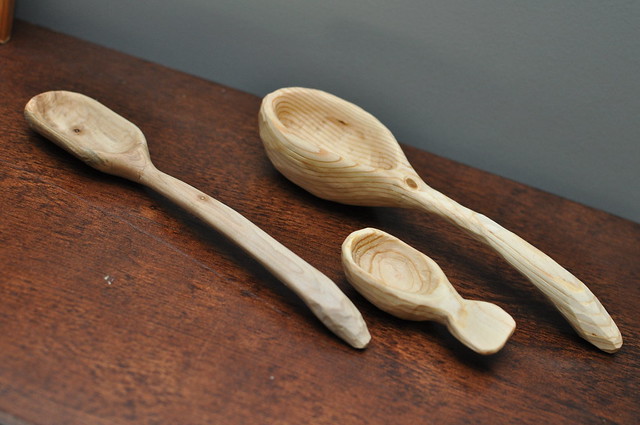
My first attempt at carving spoons
In about 2002 my mom gave me a hand carved wooden spoon she picked up in a Moravian shop in Old Salem village, in Winston-Salem, NC. I was interested in how it felt compared with the milled spoons you can buy at a department store or specialty shop. Despite feeling lighter than my milled spoons, it had greater balance. The bowl of the spoon was deeper, the handle had a sweep, and the particular spoon she gave me even had a little hook to keep it on the edge of the pot so that it wouldn’t fall in. It felt like the spoon had come out of the wood and had been worked within the grain, and because of that it seemed that it would be unlikely to split right down the middle like so many of my old spoons had.
I’d long since begun oiling my raggedy, milled wooden utensils because of that tendency to split after years of use and abuse; when inadvertently (or carelessly) left soaking in a pot of water overnight; when a house guest loaded them into the dishwasher without my knowing that was bad for them; when used as fly swatters. But there’s a point at which no amount of oiling will return a milled, split spoon to its former glory. Whenever I got out all my wooden utensils to oil, I always finished with the hand-carved spoon so that I could consider how evenly the wear showed in its character, how it held up to use and abuse better than the milled spoons. And, there was also that notion in the back of my mind that, “It’s a spoon. It shouldn’t be that hard to carve my own spoons.”
Upon moving from Orange County, California to North Carolina, I knew that sooner or later, I’d get to try this project. Our yard is littered with fallen tree debris, and we have enough scrap lying around from other projects that all it would take is the gumption to begin, and a knife to do the deed.
Recently, while cleaning up scrap from a previous project, I let inspiration take hold and without doing any real research on the subject, I set off. I considered the best way to proceed for my first attempt and decided to take what I’d learned in a simple carving project I’d done for a friend a few years back, by again going to my jigsaw and Dremmel.
I traced the outline of my favorite Moravian spoon on a 2×4 scrap and used my jigsaw to rough it out. Then I grabbed my trusty pocket knife and went to town. It turns out, this is not the quickest road to spoon carving success, but undaunted, I soldiered on. What follows is how I came to a better understanding.
First, regarding my choice of medium, I hadn’t realized how much wood needs to come off of a 2×4 to make a spoon — even after having roughed it out with my jigsaw. That spoon handle is about a half inch in diameter and the best you’re going to do with a saw is get the sides cleaned up a bit. Now, this depth is going to make for a beautiful sweep. It’s also going to allow a very deep bowl (yay!) but it’s a lot (a LOT) of wood to remove.
Second, a buck knife is great for lopping the dead limbs off a walking stick and fashioning a quick handle. It’s lovely for making points on wooden tent stakes, or cleaning a trout. It’s lousy for roughing out a wooden spoon. The edge on my knife was dull very quickly and short of getting out the wet stone I didn’t know what to do. Also, both because the blade got dull so fast, and because I had to use so much force to remove as much wood as needed to come off, the handle of my knife was not conducive to long sessions carving.
Third, how on earth does one carve a bowl? Again, my “quickest route to success” thinking said to me, “That’s easy, you just put a round sanding bit in your Dremmel and you’ll have that bowl done in no time!” I suppose this could be true if the whine of a Dremmel tool and getting covered in (and breathing) saw dust for an hour or so is part of your vision for carving a wooden spoon. If it’s not, then like me, you quickly realize that you’re walking down a failed path.
About 2 hours in, my hand aching from holding the non-ergonomically created knife handle, covered in saw dust from the Dremmel; ears buzzing with Dremmel whine, stressed out, sweaty and disgusted, I had a rough spoon starting to take shape from my 2×4 block, but I was defeated. I knew I had hours of uncomfortable carving ahead of me, followed my several more with the Dremmel buzz. Needless to say, it was time to re-evaluate.
After a quick shower, taking my turn with the baby for a few hours, and thinking over where I went wrong, I decided that carving a wooden spoon is slightly harder than I’d imagined — what, with being a modern Gent and having none of the formative education concerning wood craft, working with grains or blade care (let alone blade options), I was out of my depth. Enter, The Internet.
YouTube has a wealth of information about how to carve spoons — both power carving (using saws and Dremmels and power chisels and routers, etc.) and hand carving, using (you guessed it) hand carving knives. I also found some folks who make lovely, affordable knives, with comfortable handles for lefties and righties, draw pullers and pushers. I learned how to split a small length of branch for the start of a spoon, how to take a 1/3 approach for a flat, quick spoon or a 2/3 approach for a deeper bowl. I learned how to notch the handle’s edge of the bowl, and that there are several good ways to dig a bowl, including a bowl knife, a gouge, or various palm chisels.
I ordered myself a nice knife from Deep Woods Ventures. I also ordered a leather strop and strop conditioner to keep my blade sharp. I went to the local hardware store to buy a cheap gouge. I asked my family if they had any chisels they weren’t using and if they did, if they would please send them my way. Last, I ordered a bottle of food-grade mineral oil with bees wax — butcher block conditioner — to treat my spoons after they were done. Then, I waited.
This last is a lesson that I’m finding, permeates my pursuit of a well-rounded Post Apocalyptic Skill Set. Not just waiting though, but patience too. Patience for the right season, or the right expert, or the right soil, or mulch, or help… or tool. I’m learning.

All told, I think I spent $45 on my knife, strop, conditioner, gouge, mineral oil, and shipping for chisels that were sent my way. I could have purchased about 15 milled wooden utensils and probably been good for about 20 years, but then I’d not have gotten the lessons and learned from so much failure! And without all the failure, where would I find my fun?
While I waited for my new knife (and my leather strop and strop conditioner), I studied up. I read forums, I watched YouTube videos, and I looked at the wood I had started carving. I hadn’t followed the grain (a milled 2×4 does not, as it happens, give you the optimal grain for a spoon, necessarily) or paid attention to knots I’d have to work around or with. Also, I’d chosen a particularly pitchy piece of 2×4, that was rather green. Green wood is easier to carve, but you are taking your chances with splits when it dries out.
Finally the day came when my knife arrived, and my strop, and I could resume carving. Wow, what a difference. The handle on my new knife alone made a world of difference. And the strop kept the blade polished and sharp. Using my cheap gouge worked wonders on digging out the bowl, and I learned how best to use the angle of the particular gouge I’d found for a dollar and a half, to help out on the neck of the spoon. I didn’t bother picking up the Dremmel again, and put it away. I put away the jigsaw too, knowing I wouldn’t be needing it for future carving projects.
When I finished the spoon, I gave it a light sanding — paying special attention to the bowl, in places where I had been indelicate with the gouge. Three days (more patience) and three coats of mineral oil/beeswax later, it was complete. I took what I’d learned to a new little scrap of 2×4 I’d found that was grained properly and already shaped about how I wanted, and in a few hours, had made a small scoop with a fishtail handle.

Several days later I dove into a new project, using a chisel to split a round piece of maple branch that had come off a tree in our front yard last winter. I roughed notches in using the hammer and chisel again, and with my knife and gouge, completed that project using all my newly earned knowledge in about 1/6 the time it took me to do the other spoon, even using a jigsaw and a Dremmel at the beginning.
I’m really enjoying this process now. It’s meditative. I can make small or medium sized spoons now in a few hours or in short 20 minute bursts over a few days. I’m happy with the non-uniform nature of my results. I may even be starting this early enough in the year to make gifts for family by holiday time.